
Chat With Us
We offer 24-hour chat support

How to Make a Mold: the Basics for Lifecasting and Alginates
Engaging an artistic sensibility often leaves people confused and hesitant. Getting the vision in your head into the real world takes a thorough knowledge of techniques and skills.
The real problem for many is how to get started on that journey. Well, when it comes to lifecasting for creating keepsakes, film effects, or cosplay accessories the secret is in knowing how to make a mold.
To learn what you need to do to create a proper cast you need to start with an understanding of the basics of mold making.
This quick guide will explain the theory behind mold making a. We'll also cover the materials and how they act so you can adjust and learn as you create.
Making a mold doesn't have to be a chore. It is normally a step by step process which requires some basic information about your starting conditions and the end result you desire.
We'll break this down into the categories. These include purpose, materials, preparations, and finally some tips on avoiding mistakes.
The first step to creating a praise-worthy lifecast is knowing what you will be molding and for what end goal.
A mold designed to cast a keepsake will focus on durability and detail. A mold used to create an effective piece does not need to be reusable. For example and mold of alginate which is often used in lifecasting is known as a waste mold, as it can only be used once. Large molds take more time and have more places to go wrong.
Start by selecting the location, this will have the most effect on the end cast by changing what techniques you will need cast correctly.
Body casting requires a homogenous batch of material with no lumps, so that it spreads evenly. Too lumpy and it won't spread before starting to set. But, too thin and it will be too runny and not stay in place.
Body casting can be done in one large piece or several component pieces. Examples include a full torso consisting of the front piece and a back piece. You might isolate an area for just an upper torso or abdomen.
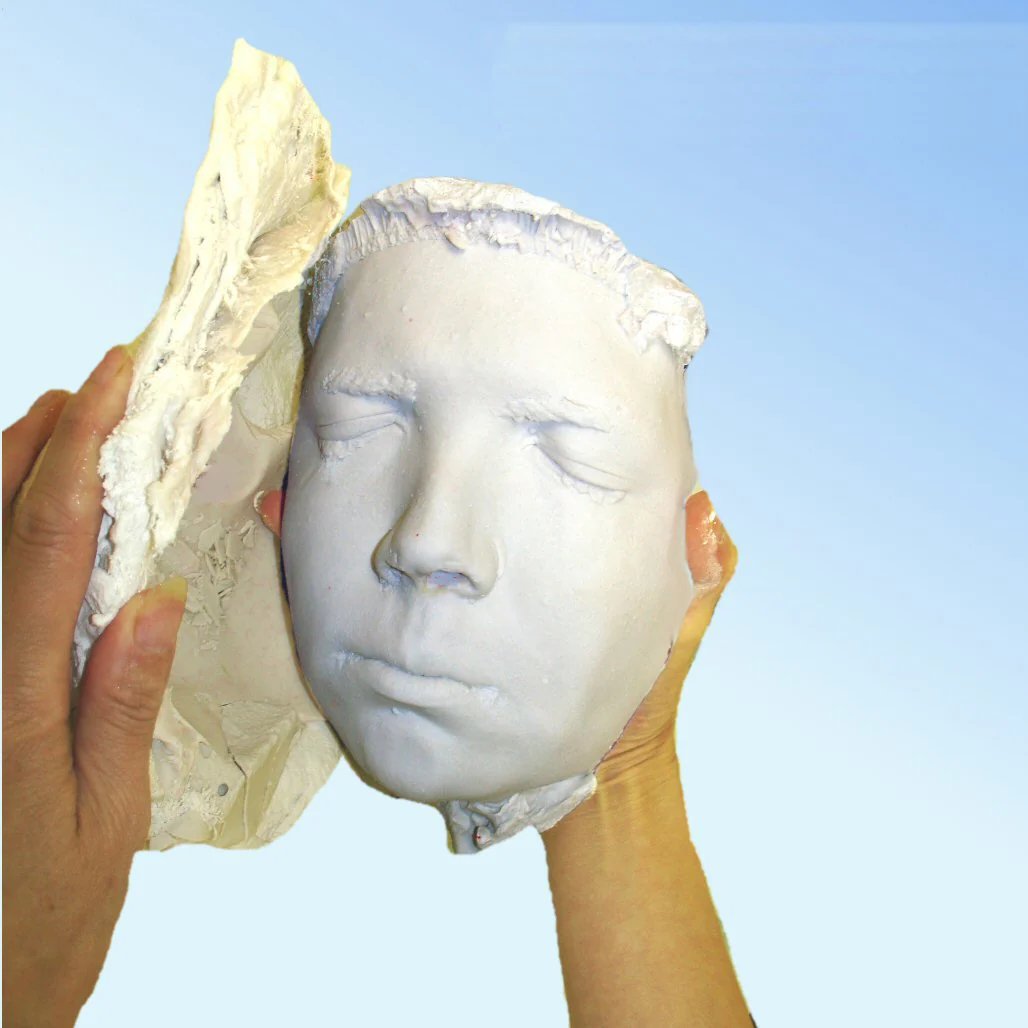
When casting a face you want to be careful to avoid breathing issues. Batches of material should be thick enough to stay put, like in the body-work, smooth enough to spread before it sets.
Do nostrils last and avoid using straws. They can be easily bumped and cause damage to the castee.
Hand casts require the most material and the thickest batches. Hands work best when a pose is considered ahead of time. Poses can consist of holding and object, too.
If your intent is to have a hand grasping something, trying to hold a position as if gripping a thing can be tiring or difficult. Start with the item in question and then remove to get a proper fit and retain detail.
Most mold making gets done with either a silicone rubber or alginate mixes. The difference in the materials requires a good understanding of what is wanted, hence the purpose.
We'll go over the pros and cons of each here.
Silicone mold making costs more than alginate alternatives. Part of this trade-off comes from the cost of the material. Silicone is, however, more durable and the material that you select when you intend to make more than one cast from the mold.
Silicone makes a better choice when creating something meant to be worn in the mouth. Dentists have done studies that show this preference relating to stability and feel for silicone casts.
Alginate products come cheaper and are mostly intended for single use casting. You could make several casts in rapid succession with only some loss of detail, alginate dries out and distorts quickly.
Alginate sets faster and allows for easier mobility in removing the mold. This is why many choose alginate for high detail work. The detail doesn't get spoiled by movements of the subject as easily as silicone.
Preparing a mix of material takes practice to get the best effect. Even when dealing with a product type you have used before, if it is a different brand it can act slightly differently.
Always mix a small test batch to confirm set times and get your thickness as you want.
Water quality can change the final product. Most tap water is fine, though for best results distilled and filter water remove the guesswork. Overly mineralized water causes clumps in the materials and can lead to lumps in the mold.
Material mixes ratios are shown on the product label. The number looks like one string, such as 270, but this is actually two numbers. The first indicates the set time, 2 minutes, and the second the water temperature, 70 degrees (Fahrenheit).
Changing the water temperature will not destroy the material unless it is much too hot or cold. Generally, a change in the temp will speed up or slow down the setting time. Plan accordingly for smaller children or more sensitive areas.
Adding more or less water outside of a the recommended mix ratio can be done to change the viscosity. This will adjust the sticking and staying power.
The biggest danger in lifecasting is creating something that doesn't work. The most common errors related to the level of detail and damage to the mold during removal.
To avoid loss of detail it is better if subjects have less time to move and are relaxed to avoid extra motion. Raising the water temp will help speed up the set time. Working with a subject a few times to build confidence will help them to avoid flinches and jerks that can create issues.
Finally, build up excess on the edges of a mold to give yourself a better grip for removing. This will help reduce tears and provides a visible seem for working with when casting.
Mold making and lifecasting skills help you to create stunning and realistic pieces for practical purpose and fun.
With the basics of how to make a mold under your belt, consider checking out some of our helpful videos for more how-to ideas and tricks.

Leave a comment